Friday 27 April 2012

My week with Sha Sha

I have spent the past week working with one of the most interesting and creative people that I've ever met.

Sha Sha Higby is a costume maker and performer who treats her work as a journey of discovery.

On Monday, I went to a lecture about her work and her processes. These are the notes that I took during this lecture:

  • She started her creativity when she was young. She used to make dolls using her step Father's old Singer sewing machine
  • Went to art school to study drawing and painting
  • She used to draw really intricate and complex drawings and her teacher would talk away her paper and say that she could draw hundreds of drawings in the time it took her to do one! This is a great reflection of her work as it is so detailed and complex.
  • "Draw, that's where the soul really comes out."
  • She went to Japan for a year and studies Noh masks.
  • She studied complexity in Indonesia for 5 years. She also studied puppetry and carving
  • She started making dolls again when she was back in the US
  • The titles of her work come from her life experiences
  • Every part of her work is hand made by her
  • She studied dance in her 20s
  • She makes costumes alongside creating her performance. She will dance and think of things that will look good when she dances in her costume.
  • Her movements are a mixture of planning and improvisation
  • She will keep adding to the costume until it's done. It can take up to two years.
  • When the costume is done, she'll sit in it for a while to sense the character
  • She's experimental and it's so simple yet so effective
  • She will work on more then one piece at a time
  • Some of the materials she likes to use are; elastic, wire, silk and different types of clay
Some photos I took during the lecture of audience members wearing the headdresses:


On Tuesday, I attended her performance of 'In Folds of Gold'. It was really interesting to watch after learning about her processes and seeing how she applies these processes to her actual performance.
She started off the performance sat in her costume surrounded by different interesting objects. When the music started, she started to move, going to the different objects and playing with and exploring them. It was very similar to how a toddler would explore things, but instead of being childish, it was incredibly interesting and endearing. At the end of the performance, the audience got to go and explore the objects themselves. This was a really interesting thing to as the objects were really beautifully made and it was wonderful to have a chance to see them up close. For example, there was a stick that had been painted gold and had sting ray skin wrapped around it with pieces of mother of pearl set in it too. It was truly stunning. I would like to think that she does that at the end of every performance.


On Wednesday and Thursday, I attended her mask making workshops. We started by casting our own masks from her moulds. She got us to use a mixture of clay, water and a fiber made from recycled plastic bottles. We poured the mixture in, them placed squares on paper towel and cheese cloth into the mixture to make it strong. I anchored some pieces of wire into the mask to do decorative things with and also to attach a stick onto. Then, while they were drying, we had a movement workshop with Sha Sha. She got us to stretch and imagine ourselves in natural environments. She then gave us paper and got us to draw abstractly to music. We then ripped the paper up and attached it to ourselves using wire and elastic. It was a really interesting way of exploring our creativity, loosening us up, and getting us to think in a child-like explorative manner.
When the masks were dry, we took them out and built onto them with paper clay and cellulite clay. I built on eyebrows, cheeks, a chin and swirls on the forehead, I also put balls onto the end of the wires.  
When that was done, I painted the mask with dyes, dipping the mask into water to make the colours run.
When the mask was completely dry the next day, I added on glitter leaves to the wires and glitter to places on the face. I painted on some detail, added a smaller mask to the wires and attached the mask to a stick painted with gold glitter.
I am really happy with the mask that I've come out with. It's so completely different to anything I've ever made and the thought process was completely different too.


My week with Sha Sha has really made me realise what some of our guest lecturers at AUCB have been saying about thinking in a child-like way. I have spent the past two days discovering new and old materials and thinking in a completely creative way. I have really enjoyed my week with Sha Sha and i;m so grateful that I got to take part in such an amazing workshop. If I hadn't done the American Exchange, I would never of been a part of it. 

Sunday 22 April 2012

Mid way review

I am a the half way point of my time here in America so I thought I'd take some time to reflect on my overall experience here.

So far I've found it to not be too much of a culture shock, although there are a few little things that I have noticed. The work ethic here seems much stronger, everyone seems really keen to work at what ever they're doing and it's really great to see. Perhaps it's because it costs so much more to go to University here so they want to work for what they're paying for?

I'm enjoying the way that the course is structured here. From asking around, I have found out that in your first year you sample everything from acting to set building and then after that you decide what you want to specialise in. You pick the classes that you're most interested in and earn credits from those classes. You get more credits by taking part in shop hours, and when a show is on, you commit yourself to a 'team'. For example, I am on the paint team.

This seems such a good way of doing things, as after working on two AUCB productions, I know how hard it is to get people to help out with the build and paint, however, if students had to take part and could use what they do as part of their unit work, the problem would be eliminated.

The only part of the education system here that I wouldn't enjoy would be the fact that I would have to take an academic minor alongside my creative major. When I ask the students how they feel about it, they generally complain that they have no idea why they have to do something like science as well as acting when they won't use science ever again in their lives. It's almost as if they're forcing students to consider an academic career.

In general, I am really enjoying my experience here, I'm doing so many things that I would never have the chance to do in England. I love being able to make props and be trusted to use workshops on my own. I also love the fact that they are so keen to teach you how to use all of the power tools and let you get really stuck into every project that you are taking part in.

I'm really learning a lot over here and loving every second of it. I can't believe I;m half way through my time in America, I've learnt so much already and can;t wait to experience even more.

Thursday 19 April 2012

Canteen Research

My next project for props class is to make a British canteen from the late 1700s. I'm really excited for this project as I'll be working with wood and exploring techniques that I haven't tried before. 


These are the research images that I have compiled to help me create the canteen:


From these images I can tell the basic shape and size of the canteen and what it's made from.

There appears to be a disc of wood on each side that are being held in place by blocks of wood that run around the outside. All the canteens are different but I've estimated that there's about 13 blocks around each one.

There's two metal strips running round the outside to hold it all in place, a canvas strap and a stopper that can be removed so a soldier can drink out of it. I will consider all these elements after I have made the basic shape.

Making a Stomach

For WIFA, we need to make lots of guts and other organs that can be ripped out of the actors. They need to be seriously gross from up close to far away. Tom and Megan (a props grad student) have come up with a way of making organs so that they're durable and light on stage, but also look pretty nasty. 


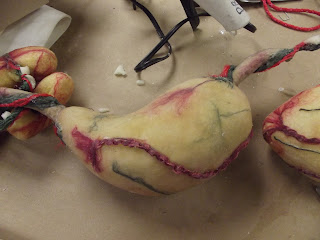
I have started on my props journey by making a stomach:


I carved the stomach shape out of a block of foam using scissors, and a snap blade. I will now sand it to give it a smoother look.


I have added red wool using a hot glue gun for veins


I realised that if you split the wool at the ends, it gives the impression of smaller veins


The green wool creates blur veins as soon as the latex is painted on


I added foam tubes to each end and then covered the whole thing in split tights which I then hot glued back together to create the impression of skin covering it


A gross looking skin 'seam'


I then covered it in a coat of latex 


I added extra veins on and covered it in latex again


I made these kidneys in a similar way, but I didn't cover them in the tights as I felt they didn't need it.
I've strung them together with red and green wool and have added on chunks of foam to make it really disgusting. 
They look pretty effective and when flung, then bounce together in a really hideous way.
I have attached these to the stomach chord.


I made part of a live using the same techniques, but again didn't cover it in the tights. I am kind of regretting this now as I think it would give it a smoother look.
I like my decision to add on stringy bits and chucks of the rest of the liver.


Kidneys close up.

Next, I added shredded calico to the organs to give a sense of skin or sinew. 


After that, I sprayed them with blue and purple to give them a bruised effect.


Finally I covered them completely with red spray paint to make them look bloody.


I am very happy with my organs, the only thing that is quite sad is that a lot of the veins didn't show through the spray paint. However, it was good to explore this technique for veins.

I'm really enjoying making props, it's so different from anything I've done before and I think I've taken to it really well. The tutors are happy with what I've made and I'm looking forward to moving onto the next project of making wooden canteens from the 1700's. I'm looking forward to the chance to work with wood as it's a material that I haven't worked with much before.


Wednesday 18 April 2012

Wood Graining

For our next scene painting class, we learnt two different ways of making a wood grain effect.

One way is by using a wood grain rocker tool. 
Using research of wood, paint a base coat.


When the base coat is dry, mix up the right colour for the grain. Mix in a little glaze. This thickens the mixture up and makes it grain easier.


The other method is the wash method.

You first do a base coat wash, using your research as a guide, the same as the above method.


Then paint on the wood grain using the research. Use a calligraphic stroke with a fairly small brush.

When that's done, spatter on a darker colour and drag the spatters in the direction of the grain.


Glaze over with a dark wash. Paint in the direction of the grain.


Finally varnish with a slightly tinted varnish.


Monday 16 April 2012

Dressing the men's room

To make the stage feel more like a men's room, I have come up with the idea to 'tile' the floor by painting black and white squares onto it.

To do this, I got the girls to help me mark out the floor with masking tape to make approximately 11 inch squares. This is the floor marked out:


I then used a roller to 'fill in' the squares like a checker board. I faded out the edges to give it a fading out effect:


When it was dry we took the tape off:


We borrowed the urinal from someone who was literally just about to get it fitted in their house which was very lucky.

For the props, we visited The Ridges which is where OU's theatre department stores their props. From there we got:


A Sink Unit, a Chair, two Stools, broken chairs and the two black and white chairs in the photo above this one.

This is what the finished set looks like:


We got the posters from a shop on the high street near the university. They sell lots of different sized posters from different decades and genres.

Finally, I drew some graffiti around the urinal to give it an authentic men's room feel.


I am really happy with how the set has turned out considering that we have had no budget and had to source everything. The overall effect is great and Dennis the director is really happy with it.